Ссылки на кракен com
Одним из самых главных способов обхода страшной блокировки на сайте Меге это простое зеркало. Источник источник источник. Разрабатывается с 2015 года, недавно появилась аппаратная версия. Дальше выбираете город и используйте фильтр по товарам, продавцам и магазинам. Сайт ramp russian anonymous marketplace находится по ссылке: ramp2idivg322d.onion. Вместе с маркетплейсом в офлайн ушел и аффилированный с ним даркнет-форум единственное место, кроме самой «Гидры где появлялись ее официальные представители. Вот и пришло время приступить к самому интересному поговорить о том, как же совершить покупку на сайте Меге. Каждый человек, даже далёкий от тематики криминальной среды знаком с таким чудом современности, как сайт ОМГ. Их полно и в «большом» инете, но в анонимной сети они чувствуют себя комфортнее и особо не стесняются. Возможно, кто-то когда-то подсчитает эти цифры, но я думаю, что суммы сопоставимы с бюджетом какого-нибудь региона. Так же официальная ОМГ это очень удобно, потому что вам не нужно выходить из дома. Приветствую уважаемые участники форума! По. Потеря этой суммы может стать чувствительным (не ключевым, но вспомогательным) ударом по находящейся под санкциями экономике страны. Учись пользоваться мозгом и соблюдать элементарную осторожность. Одним из таких преимуществ является доступность. Но если кого это устраивает - пусть всё так и оставляет. Исходя из этого, не всегда есть возможность осуществить доставку. Магазины с небольшим оборотом, которые могут себе позволить небольшой простой бизнес, зная о позиции крупных игроков, копируют эту модель поведения рассказал «Ленте. Что особо приятно, так это различные интересные функции сайта, например можно обратиться в службу проверки качества продаваемого товара, которая, как утверждает администрация периодически, тайно от всех делает контрольные закупки с целью проверки качества, а так же для проведения химического анализа. Подробности Автор: hitman Создано: Просмотров: 90289. По заявлению полиции Германии, расследование деятельности биржи продолжалось с августа 2021 года, в нем также участвовали США. Компания "МегаЗеркало" не имеет территориальной привязки к какому-либо городу, а потому оформить заказ можно из любого уголка России. Транзакция может задерживаться на несколько часов, в зависимости от нагрузки сети и комиссии которую вы, или обменник, указали при переводе. В конце года проект стал лауреатом «Премии Рунета». Всегда работающие методы оплаты: BTC, шоп XMR, usdt. «Недаром у "Гидры" три головы одну отрубят, есть еще две, так и первая отрастает обратно эта плоская шутка была популярна на самой площадке и связанных с ней форумах долгие семь лет, но теперь над ней никто не смеется. В течение дарк суток после покупки клиент мог оставить отзыв о товаре и продавце. Благодаря таким действиям владельцы авто получают шанс выиграть приз! Да и кто сказал, что в следующий раз они ограничатся только этим? В течение всего 2021. «Темная сторона» всемирной Паутины постепенно лишается действительно крупных представителей. Для начала хватит. Из обычного инета они не открываются. 4.4/5 Ссылка TOR зеркало Ссылка Только TOR TOR зеркало omgomgnxqxpzc7m6kthcwr6cawayn2fhnbjww3lgcgvfpgb4xh55ovid. Если вы хотите зарабатывать на играх, то можете зарабатывать приличные деньги, не совершая никаких действий. Завести его можно на официальном сайте. One TOR зеркало http probivoz7zxs7fazvwuizub3wue5c6vtcnn6267fq4tmjzyovcm3vzyd. Свет на эту теорию сможет пролить только время: когда воскреснет или не воскреснет «Гидра появится или не появится ей на замену новый проект с прежней командой модераторов. Жека 3 дня назад Работает! Чем дальше идёт время, тем более интересные способы они придумывают.
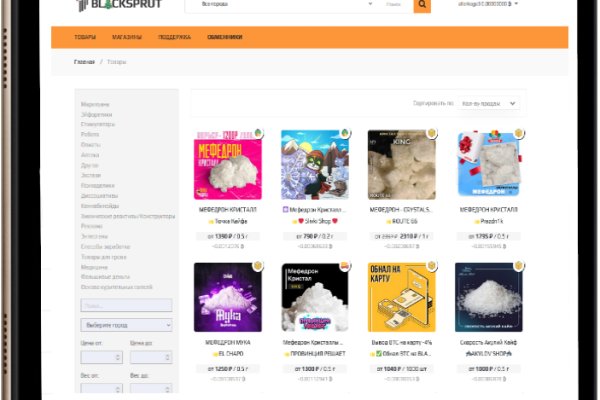
Ссылки на кракен com - Кракен сайт нарк
У нас представлена качественная фурнитура и материалы, которые потребуются в изготовлении. Крымская) ЖК «Золотые. Скейтпарки: адреса на карте, телефоны, часы работы, отзывы, фото, поиск. Робот? Годнотаба - список ссылок с onion зоны. Спасибо администрации Омг Onion и удачи в продвижении! Официальный сайт Hydra onion (заходить через ТОР). Тем не менее, для iOS существует великолепное приложение Tor. Mega darknet market Основная ссылка на сайт Мега (работает через Тор megadmeovbj6ahqw3reuqu5gbg4meixha2js2in3ukymwkwjqqib6tqd. Веб-студия Мегагрупп занимается разработкой для бизнеса в Москве, Санкт-Петербурге и по всей России Стоимость от 7500. Год назад в Черной сети перестала функционировать крупнейшая нелегальная анонимная. Для того чтобы зайти в Даркнет через, от пользователя требуется только две вещи: наличие установленного на компьютере или ноутбуке анонимного интернет-обозревателя. Как зайти на онион 2021. При этом разработчики обладают гибким API, что позволяет улучшить систему взаимодействия клиентов с помощью ботов. Ссылки на аналогичные сайты, как Гидра, где продают товары. Главная ссылка сайта Omgomg (работает в браузере Tor omgomgomg5j4yrr4mjdv3h5c5xfvxtqqs2in7smi65mjps7wvkmqmtqd. Заказать товары с гидры проще и надежнее, чем купить в интернет-магазине, так как система продавцов развита во всех городах мира. Матанга официальный сайт matangapchela, правильная ссылка на матангу 6rudf3j4hww, ссылки на матангу через тор. Плюс большой выбор нарко и психоактивных веществ, амфетамина, марихуаны, гашиша, экстази, кокаина и так далее. Официальный представитель ресурса на одном. Владелец сайта предпочёл скрыть описание страницы. Присоединяйтесь. Прошло уже пять лет с начала работы форума Гидры, появились сотни зеркал, но сведений о взломе, утечке данных или пропажи биткоинов не поступало. Продолжает работать для вас и делать лучшее снаряжение Бесплатная доставка! 2005 открытие центра мега в Казани. Никогда не употребляйте и даже. Здесь давно бродит местный абориген, который совсем не похож. Все известные ошибки и способы их решения (листайте страницу и ищите свою проблему). По своей тематики, функционалу и интерфейсу ресурс полностью соответствует своему предшественнику. Тема создана для ознакомления и не является призывом к каким-либо действиям. Мега Уфа Уфа,. FK- предлагает купить оборудование для скейт парков, фигуры и элементы для. Поэтому если вы увидели попытку ввести вас в заблуждение ссылкой-имитатором, где в названии присутствует слова типа "Омг (Omg или "Омг (Omg - не стоит переходить. Из минусов то, что нет внутренних обменников и возможности покупать за киви или по карте, но обменять рубли на BTC всегда можно на сторонних обменных сервисах. Разработанный метод дает возможность заходить на Омг (Omg) официальный сайт, не используя браузер Tor или VPN. Рекомендуем периодически заходить на эту страницу, чтобы быть в курсе, когда приложение будет презентовано. Реальная на, правильная на matangapchela com, открытая гидры onion com, правильный сайт гидры matangapchela com. Мега Ростов-на-Дону. Ссылку нашёл на клочке бумаги, лежавшем на скамейке. Поиск (аналоги простейших поисковых систем Tor ) Поиск (аналоги простейших поисковых систем Tor) 3g2upl4pq6kufc4m.onion - DuckDuckGo, поиск в Интернете. Книжная лавка, район Советский, улица Калинина: фотографии, адрес. Какая смазка используется для сальников стиральных машин? Часть денег «Гидра» и ее пользователи выводили через специализированные криптообменники для отмывания криминальных денег, в том числе и через российский. Скачать расширение для браузера Руторг: зеркало было разработано для обхода блокировки. Пользователь empty empty задал вопрос в категории Прочее образование и получил на него. Вся ответственность за сохранность ваших денег лежит только на вас. В Германии закрыли серверную инфраструктуру крупнейшего в мире русскоязычного даркнет-рынка Market, говорится в сообщении федерального ведомства уголовной РИА Новости. Исходя из данной информации можно сделать вывод, что попасть в нужную нам часть тёмного интернета не очень-то и сложно, всего лишь необходимо найти нужные нам ссылки, которые, кстати, все есть в специальной Википедии черного интернета. Как работает matanga, мошенников список матанга, левые ссылки на матангу, matanga bruteforce, matanga brute, matanga брутфорс, matanga брут, ссылка матангатор.
Но есть мультивалютные кошельки, где можно хранить сразу несколько активов. Приобрести же сам биткоин можно следующими способами: Способ. Кроме того, широкое применение лежащей в основе криптовалют технологии блокчейн во всех сферах не дает повода усомниться в том, что у криптовалюты есть будущее. Можно выставить стопы (то есть установить уровень, при котором запустится механизм продажи, чтобы не допустить падения ниже критического для вас курса). Купить Биткоины можно используя лимитные ордера и торги по рынку. После покупки криптовалюты вы можете хранить ее на личном криптовалютном кошельке или на аккаунте Binance. При желании купить криптовалюту сначала необходимо завести кошелек. На свой ПК устанавливается выбранная программа для майнинга и можно запускать процесс получения биткоинов. Что такое Биткоин-адрес для получения Могут возникнуть вопросы "что такое Биткоин адрес который нужно будет указывать при получении на свой кошелек. Бумажные кошельки: bitaddress. Вы получите лучшие предложения по покупке bitcoin. Сейчас для майнинга Биткоинов нужно уже специальное оборудование (asic) и дешевое электричество, так как иногда затраты не окупаются. Таким людям удобнее всего воспользоваться площадкой вроде bestchange. Другой, куда более простой вариант стать владельцем биткоинов просто купить. Выбираете страну и все предложения онлайн в следующем поле. В статье рассмотрим основные способы получения Биткоинов, где это можно сделать с инструкциями и пояснениями всех деталей. Перед тем как приобрести подобное достаточно дорогое устройство, предварительно стоит все тщательно просчитать и взвесить все затраты и объем полученной прибыли. По сути это специальные компьютеры, изначально предназначенные непосредственно для получения биткоинов посредством майнинга. Он, подобно BestChange, связывает покупателя биткоинов и продавца. Где можно купить биткоин: обзор всех вариантов. Перейдите. Подобные программы могут быть разными. Покупателю всегда следует быть осторожным и помнить, что правовой статус биткоина в большинстве стран остается неопределенным. В противном случае, очень высок риск нарваться на мошенника. В зависимости от сайта можно получать определенное их количество. С нашей многоуровневой и многокластерной системной архитектурой и фондом safu (Фондом защищенных активов) вы можете быть уверены, что ваши средства находятся в безопасности. Стоит поискать отзывы о нем через поисковые системы. Среди самых популярных ресурсов, которые позволяют получить биткоины просто и быстро, можно выделить следующие: ADbtc здесь можно зарабатывать, как вручную, так и автоматически. Важные моменты и возможные недостатки Существует несколько важных моментов, которые можно отнести к определенным недостаткам или отрицательным факторам задействования валюты. Cryptocurrency_widget type"leaderboard" symbol"btcusd" template"background" color"green" Содержание статьиПоказать Что такое криптовалюта Bitcoin? Известно, что Центральный Банк Российской Федерации выпустил письмо, в котором предостерегает граждан от покупки за криптовалюту, а также обмена виртуальных денег на реальные. Некоторые сайты предлагают и варианты простого обмена. Обратите внимание, что представленные здесь данные о криптовалюте (например, текущая цена) основаны на данных из сторонних источников. Платит ресурс напрямую по 10 тысяч сатоши. Для этого дважды щелкните по строке, в которой он указан. Хотите купить криптовалюту, но не знаете как? После этого покупатель должен перечислить нужную сумму фиатной валюты за покупку биткоинов со своего кошелька или карты на те реквизиты, что появились после заполнения заявки.